by DocIn 2020, after a long spell away from the hobby, devoted to other matters and somewhat isolated, I got back into building rolling stock and then back into the hobby as if rejuvenated. Recovering from Covid-19 and quarantine gave me freedom to play.
A kit is always a good way to start
Though I have made several pieces of rolling stock entirely from scratch, from the design up, or, more usually, designing as I went, it was a pair of kits from James Hilton that eased me back in. It is the very best way to begin. In 16mm, I was a total devotee to Brandbright kits. Nobody has ever made kits like theirs in terms of accuracy and finesse. Once you have made a Brandbright kit, you learn the wrinkles which allow you to make more of any kit, however lumpy. Atropos kits also took a lot of beating and, best of all, force you to do real modelling. They are senior school after Brandbright's junior shoe-in.
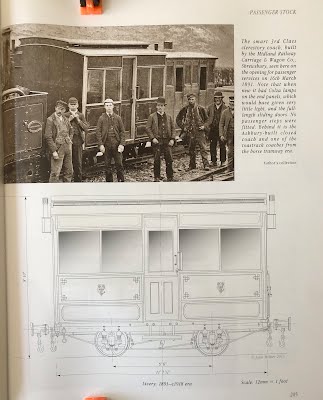
I saw a picture of a rather pretty clerestory coach, somewhere online with a comment from James Hilton that he was prepared to scale it up to 7/8ths for anyone interested. I was and I ordered two. I had to wait a bit as the project was still then just in his mind. Some months went by and i forgot all about it. That was perfect, as, had they just pitched up stat, I was still off the boil and they would have just sat festering and glowering at me. It could not have been better timed. Fate.
The kits
To begin with, I really struggled because the parts had been laser cut out of mdf,a material I had never worked with and, to be frank, had sneered at. I like to work with bass wood with its understandable grain. Not only that, James had elected to mount the axle boxes directly onto the "box" of the carriage. I simply could not accept that this would work to my satisfaction, so, true to my old ways, dredging up both skill memory and bits of scrap materials I had stored away, I built a subframe, as normal. After all, how else was I going to ensure the frame sat true on rails and the wheels ran sweetly. I had sourced the axle boxes and wheels from Si at Modelearth and, although the precise ones I wanted were not available, what I ended up with was perfect.
You know how lovely it feels when you build a frame, square and true and add the axle boxes and wheels and it all sits and runs as sweetly as kiss your hand? Well, the magic fingers are still here. Hurrah!
I used to thing PVA was the greatest glue on earth, but now I am heavily into Gorilla. It's like honey, goes off because of water vapour, as does superglue but fills spaces. If you want it to really grip and soon, lick one of the elements you propose to bond! It froths out of joins but excess can be cut off before it becomes like rock. For assembling a box to be totally true, i find the best way is to apply as little as possible to both surfaces before marrying them up. I'm talking about using a blade to try and remove it all. You can't anyway. Using a glass work surface and small set squares, clamps and rubber bands, James's boxes do fit together very nicely indeed.
Mdf still needs preparation and I undercoated using Zinsser Bin. It allows then fine sanding before painting. James's boxes come with three layers, just as Brandbright used to do. It is far better to leave off the final outside "skin of detail while you spray paint the colour, even if you use the same colour on the outer "skin". Take my word for it. Spraying onto complex detail is a recipe for disaster.
If I have any criticism of James's kit, it is that the outer skin is a touch too thick but I know nothing of laser cutting. Maybe it simply wouldn't work?
Note that I had already cut out perspex for glazing, protected it with masking taps and put the windows in. You can see from the door panels what I mean about the over thickness of the outer skin? Well it also applies to the second skin. Actually, If I were to make this again, I would probably mask off the door area and keep that as varnished wood too. I would also have cut some blanks to fit in those two rectangular lower door areas to make that recess more shallow, in keeping with real doors. Now I come to think of it, I can even now, cut and spray some rectangles and pop them in as an after-fit. I thank you! When you write up a model project, the old cog-wheels churn and you come up with solutions to problems you never foresaw? Genius!
The roof
to my mind, by far the best feature of this kit is the roof. James has designed its structure extremely well. That's not to say you don't have to think about it a bit, but it really does work well. Best of all, when you make a pair of carriages and the roofs separate ( as you should) and come to discover that both roofs fit on either carriage just as well and even whichever way round you choose, now you know some seriously accurate laser cutting (and, to be fair, assembly) has taken place.
The big secret is to ensure that the five roof supports that sit sweetly in the slots provided, match exactly the profile of the ends, because you need to make the roof from planking, just like the original. Once you have that through your head, you can plank up the roof (and here I did use PVA) but NOT apply glue to the ends or to the slots. That way, once the roof has set, it can be lifted off and left to seriously set a few days. I say that because the next job is to apply the canvas. I use a heat shrink material and a tiny iron but you could equally well sacrifice a hanky using PVA. I rather like the finer texture of the heat shrink and the fact that it comes away in places, randomly and looks like the original would have done, I fantisise.
You'll note some very natty ventilators for the oil lamps. James has 3D printed those an they are rather fine, They lack a few details but we modellers are up for that. You'll see from the picture above that I took the trouble to carve some wooden disks to mount exactly centrally on the roof. Thos are to glue the ventilators onto, since trying to fasten a thin rim with any sort of accuracy and security is a real no-no. The fairly fragile thin walled plastic (smells of mothballs) sits over the disc.
Incidentally, in the real thing, those ventilators were an afterthought. Oil lamps were originally supplied at both ends of the carriage but were so pathetic, they decided on one central one. The problem they then ran into was that they would have had to damage the central roof support, so the sited the ventilator asymmetrically. They looked vile and I simply wasn't having it. That's when the concept of real GVT went out of the window. The carriages were commissioned for the DLR AFTER the GVT found they'd made a cock-up with the lighting, so our carriages had central light BY DESIGN than you very much!
As far as I can see, the "cans" had additional strapping, a hinge and fatener and some sort of internal lid system that was held on the roof in a cradle and secured by a chain. I was unable to find any better images to model more accurately than just suggestion. After that, it's weathering, of course rusting,(what else) an blackening. Bear in mind these were for oil lamps, rthe oil being rape oil and preceded natural gas.
Oddly, i rather liked the slightly burned look of the mdf, definitely did not want GVT dark green and couldn't see how my favourite "blood and custard" could fit in with the panelling. I treid all sorts of different combinations but settled on Rover Applejack Green car spray. After recovering from Covid , which, may I say darned nearly killed me and messed my life up for over a month, my sole outing from lockdown was a trip to Halfords to collect. Well, they did say only vital trips and to take exercise. That was my walk for the day. Car to Halfords and back.

The extras
The next challenges were to add he steps and handrails and the brakes. Thankfully, there are still people on ebay selling wire rod. The steps are cut from L section plasticard I happened to have. As for the brakes, the handle was carved from basswood and I had some scale chain and nothing beats paper clips, which also hold up te steps. Originally there were no steps and no platforms either which explains the odd low setting of the door handles. The first doors were sliders. How nasty! Reminds me of ghastly student flats I once lived in! I had to laminate the steps to get the width I needed. Good old basswood and PVC!
Even the curved rack was fabricated from two lengths of 1mm square section basswood, soaked to be supple and then PVA'd together in a jig with pins to hold it at the correct curve. You may not see it but by the coupling, at the end of the vertical activating rod is also a length of chain. Oddly, I have the same device with lever, rod and chain to open all the rooflights on my big greenhouse. The mechanism is, of course, Victorian. These were the giants on whose shoulder we all ride.
It's a funny thing. When you make a model, particularly when it's from somebody else's kit, you begin to see things that bug you as you progress. I'm not being critical of the kit manufacturer at all. Thay have their vision and create something wonderful that suits that vision. Inevitably, I have another view of life and everything. Just think; something like 7% of us are colour blind in some way.
The doors simply didn't seem right and how could they? They have been simulated by fine scoring on mdf and no amount of fitting brass handles makes them look as if they could possibly open. There is no easy way of making the door faces NOT sit flush with the walls, short of cutting them out. I never quite liked the depth of the recessed panels but that was easily remedied by painting fillets and dropping them in. I'm a lot happier now. Some would prefer them as they were.
The original recesses Shallower recesses
Well, I think it looks better. Notice also that the grooves around the door have been gouged deeper and darkened. Again, I may change the colour of the grooves to be a little less black. I have also added hinges. I fear they may not last too well since they are lengths of brass pin shaft superglued into carved but shallow recesses. The suggestion of hinge parts was created by drawing a fine file across the brass that had become suitably tarnished with Carr's Black solution. Oh the little tricks we modellers get up to to fool they eye! I may, if this period of "house arrest" continues much longer, fashion some more permanent "T" sections of pin to permit a more permanent solution than just glueing.


