by Chris Bird
Anyone who has ever seen my photos or watched my Summerlandsteam videos will know that I am a total fan of Rob Bennett's woderful Busybodies figures. They are all caractures and while many in my collection are generic, others are well known figures (e.g. Brunel) and some are 'specials' of members of my family.
While it is possible to buy certain of the original Busybodies off the shelf at shows, lead times on some, and especially 'specials' can be long, so the joint venture between Rob and Si Harris of Modelearth was great news. Their idea was to have a range of kits for 7/8ths scale and most recently these 16mm scale ones, which are readily available and easy to build into impressive and unique figures.
Now the word 'easy' can mean a lot of things, and when you look at Si's photo of his superbly painted models below, one might possibly think "Oh yes....easy for him!!"
But, in fact, they really are pretty easy and most enjoyable to do to a 'normal', rather than professional, standard (see photo below). This article does not give definitive instructions, it just explains how I did it to achieve a result that makes me smile every time I look at them (and they are standing below my computer screen as I write this!). And incidentally, although I host the Modelearth pages on my website (www.summerlands-chuffer.co.uk) under Other Stuff, I have no commercial connection with these figures or the businesses involved (other than as a customer).
The figures were initially launched as a set of three, but are now available (May 2014) individually at £13 plus P&P.
Building the Kits
Not surprisingly, the figures are bagged individually and come with general guideline instructions, including the all important photo of the finished models which allow you to make sense of the parts.
The first job is to remove any casting flash with a craft knife and file. I also found one of my wife's foam backed emery boards very good for the mould lines.
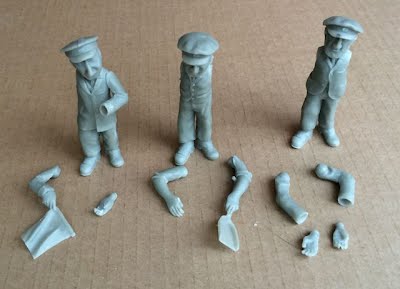
Here are the parts out of the packet:
After cleaning up they looked like this:
I was particularly pleased at how I had managed to remove the large piece of sprue from the guard's hand (left figure) without damaging the fingers...until I realised that it was his pocket watch...!
Although some parts are the same, it was very important to keep the parts separate as I was doing all three at once.
With all the parts cleaned up and sorted, it is time to try the various parts in position - and in particular, the arms. Si suggests using Bluetac, but I found that I didn't really need to do that, I just spent some time trying vaious positions, though it is pretty obvious from the moulding (and the photo) which is correct.
I decided that the heads would swivel and also the driver's hands. I also decided to go for two positions on the fireman's right arm. Even when I had sorted that out, I resisted the temptation to glue anything at this stage.
For the swiveling heads I selected a 1.5mm drill and started a small hole at the base of the curved recess in the head. Then with the drill bit located in that, I judged a vertical line (with the head in normal pose)by eye and drilled up through the head and hat. Then putting the heard in a realistic pose on the neck, I drilled down through the hole into the body. With a piece of 1.5mm brass wire (handrail wire) I pushed this through to see how the swivel works. In one I had to re-drill the body after repositioning the head slightly. Also a slight angle seems to give character (I mean how many of us hold our heads vertical while talking etc?).
Here is the pin and hole for the guard.
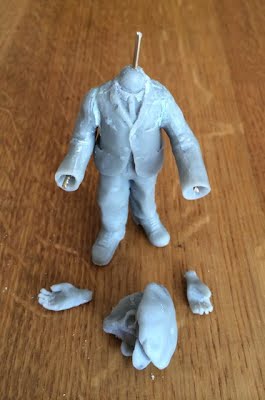
With the heads sorted, I could begin to glue the models together - but I quickly realised that painting would be really difficult if fully assembled.
So for the driver I could add feet and both arms, for the guard I could add feet and his left arm (without the flag) and for the fireman I could just add the feet.
Adding the feet is incredibly easy. I positioned them on the bench and stood the body on them, adjusting for a stable stance. As the arms will add weight in front, I leaned the body back just slightly so as still to be stable. When happy I carefully removed the body and smeared a drop of Superglue round each socket before popping it back on the feet in the position I had decided on. Job done!
Below you can see the heads, feet and one arm in place.
The driver's arms went on with a drop of Superglue and I filled the gaps at the shoulders with a tiny amount of car body filler, smoothed with my finger. At this point I decided that the driver's hands must swivel to add expression to his stance (and, if I am honest, so he could hold a Chuffer ;-) I just drilled the arms and
inserted the rods. Then, after flattening the end of the wrists, I
drilled into the hands by eye, being careful not to drill into my own
hands!! The wrists needed a little trimming to fit snugly. You could do the same for the guard's hand, but I just glued it in place as if he was looking at his pocket watch (which I need to make!).
I wanted two positions for the fireman's right arm, one touching his hat as in Si's model, and one scratching the seat of this trousers (see below left). For the hat position, I held the arm in place and drilled through the arm and body for the brass rod. Then I turned the arm to the new position (it does not fit so well and drilled through the same arm hole to make a new body hole. I went a tad far so filled the 'exit wound' with filler. With the rod glued to the arm it van now be inserted in both positions. You can see the two holes on the right.
At this stage I gave the parts a good scrub with warm water and detergent and allowed to dry, ready for painting.
Now at this stage, Si recommends using a car primer to prime the models, but I have not found this necessary with the acrylic paints that I use. The serious modeller would probably then use ready mixed colours from Games Workshop or similar, but I like to mix my own as I go along. I have a small stock of the Revell colours and for the black, I use a household matt black acrylic paint and for the white I just use acrylic primer undercoat! It would be easier to buy the proper Revell pots, but somehow I never get round to it........
Use a white plastic tray to mic colours (or the best white china if you remember to scrub it after!).
Leaving the shovel arm and the flag arm off make it so much easier to paint.
Now I did all of the main painting in a couple of hour session and I am afraid that I didn't keep stopping for photos. I did do it outside as it is essential to have good light. I used cheap brushes from a discount shop (The Works in the UK).
Clothes
Driver: For the faded denim I mixed white, black and blue with slightly more blue for the trousers.
Matt black for the hat (crown and peak later treated to satin varnish), boots and jacket buttons. The shirt was white with a little black to make it grey and straight red for the tie.
Fireman: For the trousers, white, black and blue again. Waistcoat (vest) dark grey front (black with a little white) and black back. Grey for the shirt (white with a little black). Matt black hat (with satin varnish for the top and peak) and boots. Brown shovel handle and grey shovel. I streaked the shovel blade with a little lighter grey.
Guard: For his suit I used matt black with a little blue and a very little white, to give it a slightly aged look. Black boots and hat. The boots were satin varnished as I thought he looked like the sort of guy who would polish his shoes. Buttons and badge were Ochre. The flag is the standard green with a brown pole.
Skin
There is no right answer for the skin, but I just mix white, ochre and a tiny bit of red until it looks right. More ochre and you get more tan. You could even add brown - it is easy to try things out.
I was worried about this and how to get the shading right, but I needn't have. Just one thin coat over the grey resin gives the look of slightly dirty faces on driver and fireman. The guard got two coats. You could shade in the 'blue chin' as Rob often does, but I am happy to keep it simple. The fine sculpting of these models gives wonderful contrast with no need for 'stage make-up!
The lips are the flesh tone with just a touch more red and the teeth in the fireman's mouth are just a little touch of white.
Hair
I chose brown for the fireman and grey for the other two. I streaked them with a little darker colour dry brushed on.
The Eyes
Ah - the bit I was dreading! They are open wide and quite large. But they were also simple. First the whites with a dilute white just touched on with a fine brush to fill the area. The iris would have to be quite big if central, to avoid a very surprised look which comes with white all round the iris. The answer is simple - just a spot of your chosen colour so that the iris touches one eyelid. Just make sure they are looking in the same direction! I find a pupil is not necessary, but what brings the eyes alive is the tiniest spot of white at say 'ten to' on each iris.
The eyes are incredibly forgiving - I certainly didn't get mine exactly right, but to me (and my eyesight, they look 'alive'.
Final Assembly
So now it is just a matter of gluing the guard's right arm and the fireman's right arm into place with superglue (after cleaning any paint from the joint). Ideally one might fill the joint and touch it in with paint.
Here were the figures after the first painting session - there seems to be a discussion about being late going on!
And now after the hats etc. were varnished (water based acrylic satin) and the buttons and badges touched in.
And with the alternative fireman's arm position:
Customising
I built these figures pretty much as intended by Rob and Si, but we all know that locos in particular, are not often designed with crew in mind. At the stage when one is trial fitting the limbs, it would be good to try the figure where it is going to fit. Simple, or even drastic surgery is easy with these kits so the crew can fit round servos, pipes etc.


