by Peter Bunce
At the Porthmadog model Railway show I spent my birthday money on some of the Festiniog Railway kits made by IP Engineering. I now have a couple of Bug Boxes, and one of the Curly roof vans to build, coaches, in general, look very nice but they are both time consuming and complicated to build! I think the kits are a very good start for a vehicle, as a lot of the detail is done for you. These BugBoxes are a very old design, the replicas have gone through a lot of liveries, and now are two different colouyr schemes, and are kept under cover at Boston Lodge, coming out on Gala days.
I started with a Bug Box and as it is both small and would need more work it was the First Class version: these have padded seats and more work inside to them. First the computer was used to trundle through my photo collection of the FR coaches, and some were printed out. I intend to paint them for an 1880's train so the 'Bug Boxes' will be in the 2 colour livery which was virtually a copy of the LNWR colours, BUT the deep plum colour is to be the colour that the staff of Boston Lodge use, which is Lancashire & Yorkshire Railway deep (plum) brown, which is slightly different! That will come from Precision paints, with the upper panels being a slightly off white, The panelling is black, and lining gold, that is to be done with an Edding 780 pen..
Having opened the kit, there are some parts to be made and also more parts (coach commode handles, and I will also add some of the loop style door handles to replace the one supplied which have a different end to them) to be bought - they will come from Brandbright when they have laser cut some of their new 'Ashbury' coaches. In addition I will make a rape oil lamp pot for the roof as well, these are believed to have been removed in the 1930's.
First impressions are good with the nicely laser cut pieces. Read the instructions as there are some tricky bits - but first of all I painted all the pieces with a coat of 'sanding sealer' and the using fine sandpaper smoothed off both the sides, that will produce a much better finish as they are very much smoother . The first parts to be assembled are for the floor - but before the floor is assembled I marked out the underside with the locations for the axleguards - my kits are to use 45mm gauge wheels - yes I know its wrong but my layout is to to that so that is the gauge for these kits.
Ensure they are as the assembly diagram as the 5 parts need to be correct as they determine the floor. The First Class kit does not need and plank lines scored into the pieces, whereas the Third class does - the First Class has cushions that hide the faces. I used my usual Evo-stik for glue and added underneath a couple of small right angled triangles from scrap to keep the parts in the correct shape.
The ends need to be gently curved, but first from my photos, which are of the replica vehicles which use plywood (I think) for the ends - mine are meant to be 1880 and I do not think that ply was invented then, so I have assumed that they would have been vertically planked, with the outside joins filled to make a smooth finish. For the vertical plank lines, I scored in them for the inside - these are 8mm apart; I did them with an Olfa cutter that is pushed up the end pieces NOT pulled. Now much gentle curving is required to shape the curve, I managed to partly crack one, but luckily it was at a position that is covered by the end panelling; it was superglued together, then sanded back to the right shape, the crack filled, and more superglue added, and the 'crack' area re-coated & sanded again, with sanding sealer.
To fix the curved ends is a bit difficult a good supply of rubber bands are needed to cope with the curved ends, and plenty of hands and superglue - I added some Evo-stik as a back up on the inside. Add the central seat back, and ensuring that the ends are vertical and add at the the top, and right at the top edge the two arc shaped pieces that stiffen the top edge of the ends - these can be held with some small spring clamps to keep the curve whilst the glue sets.
I have left off the end overlays as they are wider than the ends till the sides are fixed. But first there is a lot of work on the sides - mark out with a lightly pressured knife the outer edges of the windows, on both sides (use the panelling overlays for size), then place in position the supplied 'glass, and mark its lower edge on the inside of the sides - they can be used with the open windows opposite or different - turn one round. Mark the lower edge of the glass and then below this line add some planks lines - mine were done with a pencil. Using the location of the upper panel of the panelling overlays again mark out the location of them on the inside and add a outline of .040 x .020 plasticard, and paint it when dry with a coat of Humbrol acrylic sand. Outside eventually a set of false louvres need to be fitted.
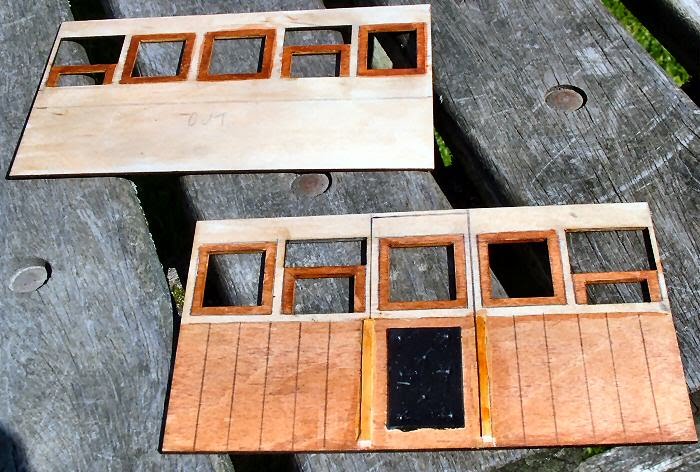
Now to the colouring - I have used acrylic inks as they dry fast and are transparent. - the 'Games Workshop Chestnut' colour is the main color with a drop ot two of a 'Rotring Artists color ' dark brown ink added (it has a slight red cast which is what I wanted to deepen the colour slightly), multiple coats are needed as it is quite a 'thin, or not dense' colour. Here is a photo of the sides being coloured, the sun has given a lighter impression than they are, but remember that they need to be lighter than the full size (replica) otherwise it will be a bit of a 'black (or mahogany) hole!

.
The top one is the outside, the thin pencil line id the division of colour lien below L&Y brown, above a very light cream colour.. The lower one is the interior with a padded panel on the door with a couple of added plasticard pieces for framing the door, these have one coat of inl over the Humbrol sand colour. The upper part of the door is marked out in pencil. With the lighter colour of the windows than the dark brown burn of the laser cutter I touched up the edges with a thin coat of Humbrol sand before adding some ink, so the colours roughly match.
I will add a thin strip of plasticard to act as a windowsill over the 'glass' and possibly between the windows as well - all are mahogany colour on the replicas
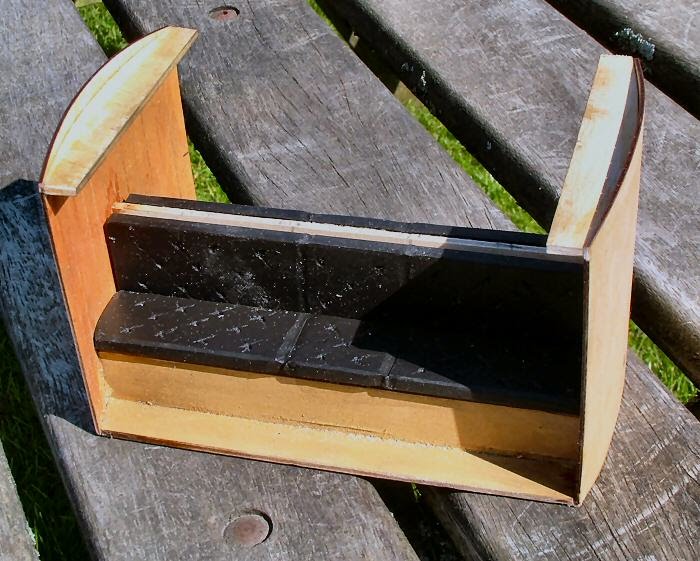
This is a overstuffed 'First Class' so seats are needed - made from 5mm PVC foam strip with auto centre punched dimples, and roughly added fold lines from them, they are then painted black. add some scrap to induce a tilt to the back part and eventually they will be fixed in position. The on top of the backrest a long strip is added and a couple of 1.6mm holes drilled through this and the seat back - these holes are for 1.5mm brass rod that replicated the roof supports which are just outside the centre (removable in the full size version) cushion - this is to allow patron to climb over the centre of the seats - that is the only way to access the other side! (I wonder just what the Victorians thought of that?). Here are the seats, without the centre strip.

This photo also shows the upper stiffening pices for the curved ends.
There is a single crosspiece supplied in the kit to hold the sides together, I made a duplicate, and they will be fitted each side of the central door.
The roof was started next - I don't think it is thick enough, a single sheet 1mm thick is supplied, and I added a couple of 1/2mm sheets to that (that way it is easer to curve the extra sheets) . Now it is the same thickness as the roof strips for the curly roof full brake kit.
Mark out a centreline and if fitting a lamp pot the centre of the above line as well: I then made four roof braces from 1mm plasticard and allowing for the upper end stiffeners spaced out equidistant along the inside of the roof, thus fixing the curve needed for it. I also adder from .020 a strip each side to act a a gutter front piece and it tidies off the roof edge at the same time.
The lamp pot (which held a rape oil lamp dropped in when needed) was made from a couple of 2mm discs and a bit of scrap tube, with plasticard rod for the hinge (for the top) and the pull handle is made from a tiny bit of brass strapping (from etched kits) for strength.
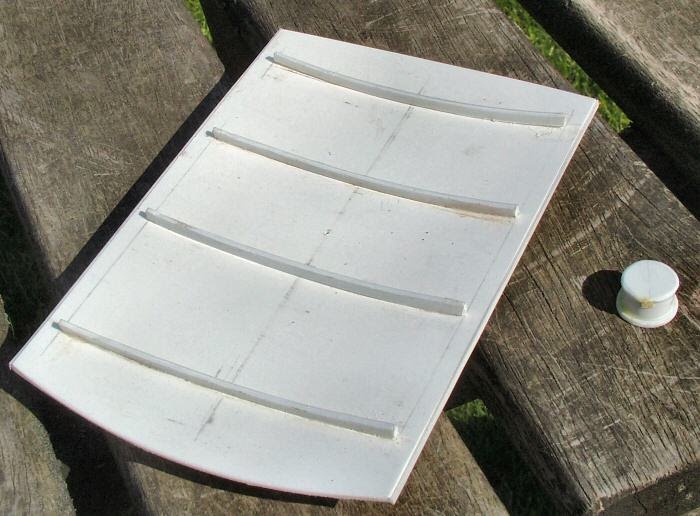
Here is a photo of the roof, with at the side a lap pot under construction. There will also be some side pieces added when the sides and (arc topped) cross pieces are fitted when the body is assembled.

!
To the interior I added a couple vertical wires that are fixed into the filler piece between the seats, painted a red oxide colour – these in the full size vehicle hold up the roof, in my model they end just before the roof level.., There should be a half globe for the oil pot, but so far that has eleuded me - enquiries are contiuing for a source, the base is there though.
The inside of the sides have been finished off, and one has been gl;ued in position – the colour has been deepened, and a thin panel added above the windows, ensure that the top of the panel will clear the stiffening parts on the top of the ends. The windows themselves have new ‘glass’ - I replaced the thicker pieces supplied – I use the clear plastic packaging that is very prevalent now instead. They have gained some straps for the drop windows, made from plasticard, and a waist strip made from a couple of layers of plasticard added to tidy things up. Mark the door on the inside, and not forgetting that the Festiniog had doors opening the reverse of normal add a couple of small blocks for the door latches.
These vehicles as a result of the inspection by Captain Tyler had window bars on the inside – these are made from 1mm dia. brass wire (cut to size clean then varnish them – hopefully that will stop them tarnishing!) mine are fixed to little spacer blocks and are in small pieces which used up some bits of larger wire – no fixing blocks are on the extreme ends – there is no space for them; however they can have some clear glue added to keep them still. These window bars were only taken off in the 1930’s, and as anybody who has been on the Festiniog will know they would be very useful for safety – the clearance as certain parts is very small still. The third class coach will have black painted plain iron rod – not brass plated.
The roof has has been painted a dirty grey, and the inside is finished off with natural wood colour roof sticks, and a cream colourwith the planks lined out with a d .
fine pencil, not seen very well are joining pieces between the roof stick that abut the inside of the body
The outside of the main panels and ends have had another coat of sanding sealer (one was not enough), and have been undercoated a couple of times – the colour is not right I will be buying some Precision paint colour (L&Y coach brown) as top coat. The paneling overlays have had a small piece added to widen the area for the outside door handle, the colour scheme if the 'Victorian' one and the upper thin panels on the outside are to be fillerd with two sets of mick louvres, and a louvre panekl in the door: those are 1mm thick plasticard and are to be the 'Light Antique white' of the waist panel. The handles have been cast with the handle projecting horizontally – I think they will be a bit prone to damage, I may change them to the dropped down position. No commode handles are supplied – some will be bought from Brandbright. Meanwhile all the overlays have been painted with black as an undercoat.
.
.
.