These kits are now available from Houston Gate Locomotive Works
by Chris Bird
The Prototype
These coaches were first built in 1879 for the Penrhyn Quarry Railway to carry the workmen up to the slate workings. Amazingly they could carry up to eight men per 'compartment' and the discomfort of this, in all weathers, can only be imagined!
There is an original, restored coach at the Welsh Slate Museum at Llanberis which I happened to photograph on a recent visit:
This was very interesting as I had built a 16mm scale IP kit and laboriously painted it the 'Brinjal' colour. Why laboriously? Well because it took about seven coats to cover properly....
So when I looked at the Acme kit, I was pretty clear that I didn't want it to be Brinjal!
To be honest, even though I am really pleased with the Acme slate wagons, I was not sure about this coach as it looked huge and perhaps too big for my 32mm (18") railway. Now it is made, though, and put in context with even a small 7/8ths" loco such as the Accucraft Quarry Hunslet, I have to say it looks just right - especially with some of Rob Bennett's Busybodies. Indeed I have heard some comments from them that it is too snug ;-)
The kit arrives in a very neat cardboard box, and this time it had the Accucraft steel wheel sets. I got it all out and you can see here what you get:
It all seemed pretty straightforward and it comes with illustrated instructions so did I leap in? No - I started to worry about painting and bolt heads and details! I wanted it to be Brooklands green to match my other coaches and this is Acrylic car spray, but what about the inside, and the floor? Steph' Hicking said in her Garden Rail Article that she had painted all the parts first....and she embellished the bolt heads. What to do...........well the reult of all the deliberation was that I did nothing for a good few weeks........
Then I decided that as this was designed to be a simple kit - I would keep it simple and, most important, quick!
Day 1 - The Build
Well, it was 'afternoon' 1 really, as I built the kit in about three hours. I used waterproof PVA and was helped by the hot weather giving rapid drying times.
The instructions start you off with the simple stuff - mark a centre line and lines for the inner sole bars.
Then it is a matter of gluing on the outer sole bars. I am lucky enough to have some steel blocks which are dead square, but these could be wood (wrapped in a layer of cling film to prevent sticking).
With the floor put aside to set, I turned my attention to the end and side panels. I feel that for these to look right, the edges do need to be slightly rounded off. I used a foam sanding block and some of my wife's foam backed emery boards. I did not sand the surface as the MDF just doesn't need it.
I then glued the two sets of end panels:
Before clamping them into place these could be clamped into place:
Then it was a matter of marking out where the double seat ends go and gluing them into place. Great care is needed as I find that the panels move when you put the clips on. It needs checking and re-checking!
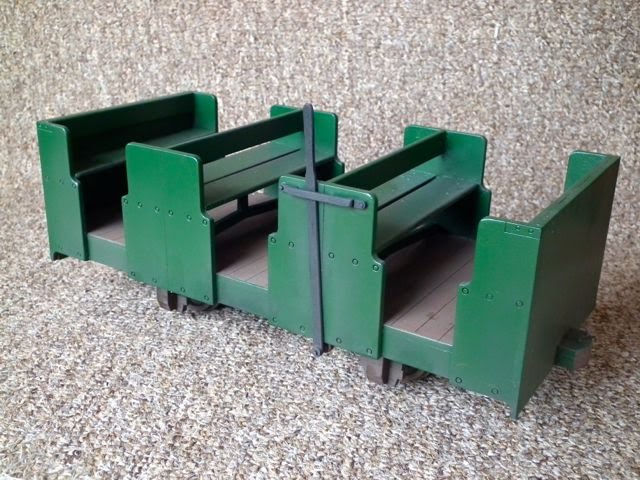
So here it is sitting on a couple of blocks while I turned my attention to the seats.
I rounded off the edges and then tried to work out how they fitted. The instructions leave this to the builder and I confess that I puzzled for a while. Should the double seats touch with the support under? No - that would make them too narrow. And what height? The bolt heads are clearly for brackets on the original......
Then a Busybody came to the rescue. The height had to suit him and with his help, I made a reference block 29 mm high. In order for him to sit comfortably on the double seats, they needed to have a gap the width of the support. So with the decisions made, I first glued in the supports
And then the seats and backrests:
While the glue was setting, I glued together the inner sole bars:
The axle-boxes were easily put together using the brass bearings as a guide:
Then it is a matter of marking the sole bars to locate the axle-boxes. Mike suggests marking at the centre line, 6.4mm from the end, but I found it easier to mark at 5.5 so I could butt the outer edge up to this. At this stage I had not chamfered the outer part, but did this on the bench sander when the glue had set.
After fitting the wheels and gluing in the sole bars, and then assembling and fitting the dumb buffers, I left it all to set overnight.
After my experience with the slate wagons, I knew all about the need to settle the fibres after sanding. Sanding sealer had been suggested to me but I remembered Doc Turner's mention of shellac primer and I had a little B-I-N primer sealer in stock. On opening the tin I found a quarter of an inch solid in the bottom, but knowing shellac dissolves in alcohol, I added some bio-ethanol and left it overnight. The next day a good stir got it flowing and I brush painted the exterior and the seats etc. Within 30 minutes it was dry and I could sand it with 600 grade. What a joy - it gave a beautiful finish. Yes it was fiddly but worth it. (no photo I'm afraid).
When all was dusted off, I was able to spray the whole thing, including wheels, with grey acrylic car primer. This had 20 mins in the oven at 80 degree C.
Then, because I wanted to paint the floor with water based acrylic, I spent about half an hour masking. Where I couldnt get the masking tape under the seat supports, I used post it notes! I did think about masking the plank edges in the doorways, but then decided that life is too short!
So it was on to the Halford's Brooklands Green aerosol. I have to confess that I had a little problem here. In order to get coverage under the seats and in all corners, I got a bit too much on a couple of outside panels and had two runs. When the paint had flashed off, I baked it at 80 degrees C for 20 minutes and then, when it had cooled, took the runs out with 600 grade abrasive before re-spraying the outside.
I have say that I was amazed the masking worked so well:
I painted the wheels and underside with Revell Leather Brown, as this is pretty much the colour I see on real, working wagons and coaches. Here it is shown with the first coat on and the brake gear assembled. This is cleverly made and easy to assemble from the photos provided by Mike.
The one deviation was to pick out the mock rivets holding the brake lever strapping and replace them with dressmakers' pins. I drilled 0.5mm and tapped them through before snipping off the excess.
The floor was brush painted in a mix of the Leather Brown and a little Ochre and white to lighten it. I pondered about grain, but then decided it would not be visible in reality - well that's my excuse!
Some of the team trying it out in its shiny, ex-works state.
Then for a little weathering. I mixed a little black, leather brown and matte varnish and airbrushed it on in very thin coats. Using bio-ethanol and water makes it very quick drying. I used a little more black in the mix for inside.
And it will take quite a lot of folk, though nothing like the originals with very small miners!
Conclusion
Well once again I have been pleasantly surprised by a kit. I thought it would look too big on 32mm, but it doesn't. I thought it would be awkward to paint, but it wasn't. But then I thought it would look good in green rather than Brinjal and I was right! Yes I could have used more detailed couplings and maybe enhanced the rivets, but the guys riding inside wouldn't notice and now it's finished, neither do I . And I have to say that when I see it loaded up it just makes me smile ;-)


