by Chris Bird (November 2018)
Background
In the November 2017 issue of 16mm Today (the magazine of The Association of 16mm Narrow Gauge Modellers), Mike Pinder gave the background and build details of his award winning "Bennes Ovales". He had based these on photos from a small french mine run by Shneider at Haute Meule, which clearly showed that these small, oval mine tubs were built using barrel technology. Mike went on to give drawings to 7/8th scale and an account of his sophisticated CNC milling of jigs to make the woodwork.
Here, thanks to MIke, is a photo of his ex-works and well used tubs that won their class at the 16mm Association Modeller of the Year competition 2017
And here is one he posed with his Acucraft Decauville. Note that the tubs are 45mm gauge and the Decauville is set for 32mm for running on a club track.
Mkie has also supplied me with a link to a French language site which also has some nice photos of these tubs in use:
And scroll down to see some more detailed photos of one of Mikes's models.
My Version of the "Bennes Ovales"
Well after reading Mike's article, I rather fell in love with these quirky tubs - but know that I would never have neither the skill or the patience for Mike's method. So I began to look at various oval containers, such as the Philadelphia Cheese tub, and drew a blank. Nearly a year later, I was in The Range (one of those shops that sells craft stuff along with ornaments DIY etc.) and spotted some small, oval card boxes that looked close to the right size. The challenge was on!
So here is my "homage" to Mike's "Bennes Ovales".
It started with the box - and here it is: 103mm long x 78mm wide x 50mm high. Mike's drawings of the tub part show 94mm long x 71mm wide x 53mm high - so the box is slightly over scale - but OK for me.
The first job was to paint it inside and out with slightly diluted waterproof PVA (about one part water to three parts PVA) and let it dry overnight.
I did consider lolly sticks or even coffee stirrers for this, but eventually decided to use some walnut edging veneer that I have had in stock for many years. This is iron-on and still widely available in different woods. The strips were too wide, so I cut it down the centre with a craft knife and straight edge. I then cut the pieces to approximate length with scissors.
I borrowed our spare iron and having marked some verticals on the box, as reference points, I ironed them on.
They looked a bit rough, but a careful sanding and trimming made them look better.
The Structure
At this stage it was all a bit flimsy, so I decided to add some reinforcing structure. As the tub would only be seen full of coal, this was OK. I cut an oval from hardboard and supported this on a small piece of batten, glued in.
This made it much more sturdy.
I also decided to darken the wood using a medium oak spirit based stain.
The Banding
I cut the 'steel' hoops from 20mm card that came as packing for a shirt. To get the length I needed, I had to cut diagonally.
I then painted these both sides with the diluted PVA and when thoroughly dry, I gave the two coats of water based matte black paint.
Here you can see the darkened wood and the bands ready to appyly. I used PVA and butt jointed them by cutting through the overlap with a sharp scalpel. On reflection, I think they are a bit wide......
The outside bands were easily held while drying with elastic bands. The top one being about 2mm proud to allow for filling.
The top inside one was held in position with various clips.
Mike Pinder had used 30 thou Plasicard for the banding and had filled the top with black Milliput. As I was doing this on the cheap, I just filled the top groove with ready mixed Polyfiller.
When dry, this was sanded flat and painted black.
The Chassis
This took a lot of pondering, but I eventually decided on some mahogany and softwood which I had. The wheels and axles would be from Binnie engineering.
It was here that I made a mistake. I needed a back to back measurement of 28mm for 32mm gauge and so made the chassis 27mm wide, not realising that the wheel bosses protrude 1mm on the inside. (It should have been 26mm wide).
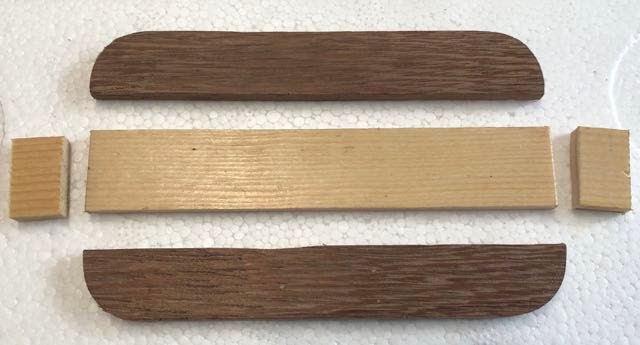
Here are the parts:
I glued it together with superglue. The saw cuts are to show where the axle tubes will go.
I filed out the grooves for the axle tubes (5/32" K&S tubing) and then glued them in with rapid epoxy.
I now found I could not get near the required 28mm back to back and so had to sand the sides of the chassis and the backs of the wheels. Next time I reckon about 25mm wide for the chassis - but that will be after measuring twice!
There were no dumb buffers on these wagons, but I wanted to be able to couple up and shunt with my other stock. Whatever I used needed to be at the level of the lowest band so I chose some steel strip and bent it to shape.
These and the inside of the chassis were then painted matte black and some simple chains screwed into position.
And here Pierre is trying it out behind "pip" from Modelearth.
Apologies for the over-scale cobwebs.....
Mike Pinder's model
When I first contacted Mike, to show him the draft of this article, it was with some trepidation. As you will have seen in the in Background at the top of the page, he has been incredibly helpful. And then, to my astonishment, the postman delivered one of his models! He had made four of this type and had very generously given one to me!
Here it is - a real work of art - and you can just click on the image to enlarge:
More Wagons
I made the first wagon, as detailed above, back in October/November 2018 while undergoing some pretty heavy medical treatment and although I started three more, they got shelved for about ten months.
In September 2019, as the weather turned wet, I returned to the workshop and got on with them.
The main differences are:
1. I used black plasticard for the strapping (as used by Mike pinder) and made the middle strap thinner.
2. For filling the top strap I used black Milliput (again as used by Mike). This was not too bad to use when I first got it, but months later it was a total pain to mix.
3. I used Talisman castings for the couplings. These seem like a lot of work as they have to be cut, cleaned up, polished, assembled and then blackened. It was easier than I thought! I left the parts on the sprue and gave them a quick sand with a fine (and worn) foam sanding block. Then I used a brass wire brush in the Dremmel to polish them (eye protection essential). Then cut them from the sprue and a final clean up with file and Dremmel. Finally I degreased them it thinners, dried them off and dunked them in Birchwood Casey brass black. Rinse, polish and job done.
Here they are with my modified Regner Vincent:
I added some lead to the middle of the chassis and glued in the coal loads using dilute PVA
Weathering
I decided that as the barrel staves were still wood coloured rather than grey, I would assume that they were still pretty new but dusty and dirty from use. I mixed Revell Leather brown, matt black, a spot of white and then Humbrol matte varnish (all water based) with a little water and a good shot of bioethanol (for quick drying). I then airbrushed this on in multiple coats until it looked OK to me (proper mask essential).
Here they are with my PPS De Winton
And here with Pip from Modelearth:
And here is a little video of them in action:


