by Cheeseminer Continuing the 'starting out' pages written during the early planning and creation of the FWR. Documenting the mistakes, as it were. TrackbedThere is much debate on the subject of what to mount your track on. One factor in this is what height you want the track at. For the purposes of this discussion I'm limiting myself to to a 'ground level' trackbed because that's what I've gone for and have experience of. I can understand the attractions of a waist-level raised layout, especially for Gauge 1 and smaller, but it doesn't provide what I was looking for.At ground level there seem to be four basic options.
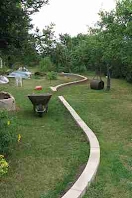
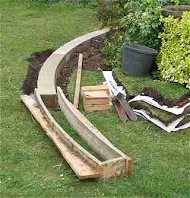
There are those who advocate modelling the real world solution of a loose ballast trackbed with the track laying freely on top of this - on the basis that it's good enough for many tons of 300mm:1ft scale traffic so it should be good enough for lightweight models. It strikes me that there is something wrong with scaling the physics in this way, and that not having the opportunity to scale down wind, rain or cats in the same way as the trains probably makes this quite a high maintenance option. Again, I've not tried it so will shut up now. However, it does ocur to me that combining these first two options might be a go'er. This brings us to the two obvious candidates. Timber, or a hard building medium (concrete or blocks laid in concrete). The essential arguments are robustness vs speed vs appearance. For a trackbed that doesn't get much higher than a couple of inches above the surrounding ground level I went for pouring a concrete trackbed in situ. The obvious benefit is that this clearly isn't going to move anywhere fast. The big risk is that this clearly isn't going to move anywhere fast. You need to get it right first time, and, if it does subside at all, you've got problems. However, for the appearance I was wanting this is clearly the best candidate. Don't underestimate the work involved with concrete. If you have a single 6" wide trackbed, averaging 6" depth, then every 36 yards requires a cubic yard of concrete. A cubic yard of sand is about 1.5 tons, a builders merchants' bag (one of those big beasties) is typically around a ton. Don't forget delivery charges, and you may well want to beg, hire or borrow a mixer because mixing a few tons of wet concrete is hard, slow work. In hindsight, I'm not convinced I'd do the same again. It's not a clear choice. The appearance of the sections I've completed is excellent, but it took several months. I would certainly reconsider using concrete blocks next time - being quicker to lay but probably more expensive. The obvious alternative is that of using timber, between suitable supports. All the books say don't do this because it rots, deforms, etc. However, I've seen this done very successfully - even using timber supports. On the third hand, since learning what goes into tanalised timber to make it rot-proof I've been decidedly wary of the stuff. At a later stage, when adding a branch, I considered the option of a wood-based trackbed but in the end I opted for concrete again for looks and robustness. On the fourth hand (this is getting silly) it would be an awful lot easier to screw track down into wood than concrete. BallastPut seven Garden Railway'ers in a room and you'll have fifteen opinions about ballast. There are a great many who simply don't ballast their lines and I can quite see why. The function of ballast on 12":ft lines is to provide a firm 'gripping' base for the sleeper to sit into. In general, for a garden line, the function is decorative. That said, there are those who apply the prototypical way, and do just sit their track on a suitable (I guess fairly deep) layer of ballast. This may be easier with LGB track which has a huge profile and thus doesn't deviate much, whereas I'm using Peco G45 flexible track which is somewhat inclined to flex - not unreasonably. If you decide to ballast, there are two questions.
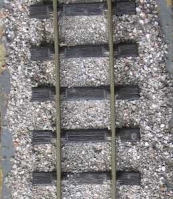
First attemptThis is where I started - and made all the mistakes so listen carefully. The 'obvious' choice seemed to be fine gravel from the garden centre down the road, and dribbling on PVA in much the same way as I'd ballasted a few miles of OO.Two basic flaws with this - and one messy consequence. One, the gravel was (a) a bit big - scale it up and even quite small stones are slightly larger than scale footballs, and (b) it was rounded - which makes the football comparison even more pertinent. Study real lines and you'll notice they aren't ballasted with footballs. I persevered with this for a bit, as you do, picking out the larger pieces. The photo shows it at it's best - with the larger pieces either picked off or blown/washed away. Ths introduces the second issue. I'd held the gravel down with good old PVA. It had worked before... indoors. Unfortunately this wasn't waterproof PVA and while it worked for a few months, nothing of this ballast is still attached except by gravity. However, the big mistake I'd made was relying on a combination of 'no nails' adhesive and the ballast/PVA to hold the track to the trackbed. No Nails proved positively useless at this, and the PVA equally so, so the track moved with temperature fluctuations etc. No intrinsic problem with this especially as I'd allow expansion gaps etc. However, gravel got under the sleepers and the track started lifting... Time outTime to screw the track down. Much whinging and drilling of concrete, but it ain't moving no more. Use brass screws. Real ones; those from the DIY store could well be a nanometer of brass plating on instant-rust steel. Use a magnet.Take 2Two big changes here. One was to source a much finer grit that was actually gritty. The other to mix it with cement. There were finer grits available that were for showing off your exotic alpines - bagged small, priced big. However, I did find a cheap supplied of recycled material (I like recycling) in the EcoAggs range from another garden centre. On more recent sections I've mixed in some fine 'alpine' grit and some sand, and this helps both the size and colour a bit. The grit/sand/cement/... mixture is mixed, and laid, dry, then brushed in with an old paintbrush or similar and finally gently sprayed with water - just a fine mist. So far, this has held firm over the winter. [Some years later...]I forget exactly when the above was originally written, but I'd estimate about 3-4 years ago. The fine grit/cement combination is still my preferred option. It needs maintaining annually but then that's realism for you, and it's fairly quick to mix some up and fill in the gaps left by frost etc. and the net effect is one of a maintained railway and not a colour-uniform model. The concrete trackbed is something I'm less sure of. There are a couple of places where things have moved and upset the gentle gradients, making one particularly difficult in places. Ironically, the section that has moved is one of the biggest, and 'immovable' sections of concrete. On the other hand, it's been a doddle to keep the grass maintained up to the edge, as you just strim against the concrete vertical. I think if I was doing it again I'd seriously consider concrete 'pads' linked by timber sections. One giving the stability and levels (especially as you'd go deeper if you were only doing spot pads) and the other giving ease of construction and replacement if necessary. The other thing I'd do is make it wide enough for double track all the way around. |
Railways > Flatland Washes >


