My method of making Corrugated iron, by Peter Bunce
I use aluminium sheet, cut from Fosters Lager, or cider cans, that our local youths having drunk the contents then discard. Therefore they are the best price possible – nothing! Some cans Carlins lager for instance are made from steel, that is no good, If when using the slitting saw it sparks, it is steeel stop and discard the can into the bin! Even Fosters use some (very few( steel cans.
To release the sheet from the can, and using a slitting saw in a Dremel or such, and with some protective glasses being worn, having washed the can out thoroughly, I cut off the top & bottom of it leaving you with a tube: slit that with a pair of scissors (get your own they are now very cheap) the resultant sheet can be straightened out by pulling it against a right angled edge (I use the steel tube that is under my workbench, that was an old desk). With the now flat sheet having worked out the size of the sheets needed use your scissors to cut up the sheet: I find I can normally get 4 pieces out of each sheet, an average size for my sheets is 90mm x 60mm. Always do some extra, they will generally be needed if you are anything like me.
The sheets now need annealing, to soften them: we have a gas cooking stove on which I use one of the rings, I think that a gas cylindered blowlamp could also do the job with care – fix the blowlamp and it is then like a gas cooker ring.
Hold the sheet in a pair of long nose pliers and continuously pass one half of it over the flame keeping it moving all the time, if you don’t it will melt; generally the corner goes silver and turns up slightly. What you want is the sheet to go brown, as evenly as possible, it can be turned via a twist of the wrist, I prefer to have to unprinted side uppermost as I can then see what is happening more easily. Remove the sheet and turn the sheet round and repeat the above, Let it cool off, and the continue with the rest doing the same.
When all is complete open the kitchen window to get rid of the smell – I think it’s the coating that the cans have as it burns off. The sheets are now ready for the crimper – mine came from Fred Aldous in Manchester but Hobbycraft also sell them I believe.
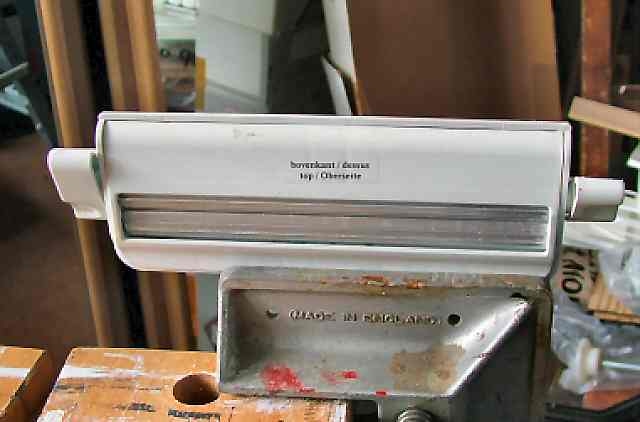
The crimper needs to have a handle at each end, otherwise the sheet being crimped will not run straight; and it is much more likely that the upper roller will lift resulting in no courugations in the centre iof the sheet – not the intention! Here is a photo of mine in a ‘Stanly right angled vice, which is fixed to a Workmate to keep both still; note how far into the vice it is fitted, that is to keep it quite still, leave a space at the ends so you can add pressure when turning the handles. Take a sheet and feed it into the join between the rollers, and gently turn them slightly to grab it, using both handles, check it is straight, and again using both handles feed the sheet in for about three corrugations, it will be hard to turn – do it gently, feed it back on itself but not enough to let it fall out, then do another 3 corrugations again reversing it – this reversing will enhance the corrugations, continue to the end of the sheet, watching to make sure the rollers do not rise in the middle, if so you need to add pressure when re rolling (no hands available otherwise!), it really boils down to practice and watching what the sheet is up to it is much easier once started. Just ‘bear in mind’ that it can & will try to twist off line so producing corrugations that are not at right angles to the length of the sheet, with care you can go over the bad one to get it straight.
I fix them to a plasticard ‘under roof, that has been braced if required (the sheet is 1.5 or 2mm thick), but first the edges of the roof around chimney stacks or such like has some aluminium foil ‘flashing added – I use the foil from food trays here as it is more flexible: fix it with Evo-stik.
The corrugated sheets are fixed with ‘window frame sealant’ - mark out the roof with a line to work to starting from the lower edge, put a thin layer on the roof top and bottom, (and possibly the end edges, and some more on the corrugated sheet, the intention is to fill the corrugations on the lower edge. To join each sheet to its neighbour I use a corrugation full of Evo-stik. The first layer is obviously on the lower edge of the roof, the next layer is offset slightly, and the join between the sheets is about 10mm or so, again sealed with Evo-stik. Rub off any excess Evo-stik before it sets hard: I find that Wilkinson’s Stores have the cheapest price for tubes if there is one near you.
The roof ridge is normally a piece of the same flat aluminum sheet, the fold being added with the reverse of a knife blade, use window frame sealer (to fill the corrugations), and any other edges (round chimney stacks at the back of a false front etc ) has another layer of foils (as above) to finish off, and let it dry.
When complete, I paint my roof as the paint will add another layer of weather protection – I use the ‘tester pots’ of light grey, or brick red (red oxide) masonry paint from the likes of B&Q paying particular attention to the edges of the corrugations and around the edges & chimney stacks. If you also fit bargeboards these are also checked, to see there are not gaps between them and the edge of the corrugated sheet. Give the roof a couple of colours, which will give a weathered galvanized iron finish, and then weather it with whatever colours you use on your railway: I use acrylic paints here and finish off with a layer of varnish.
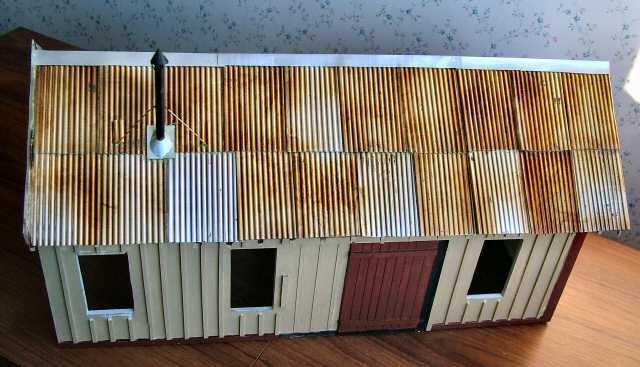
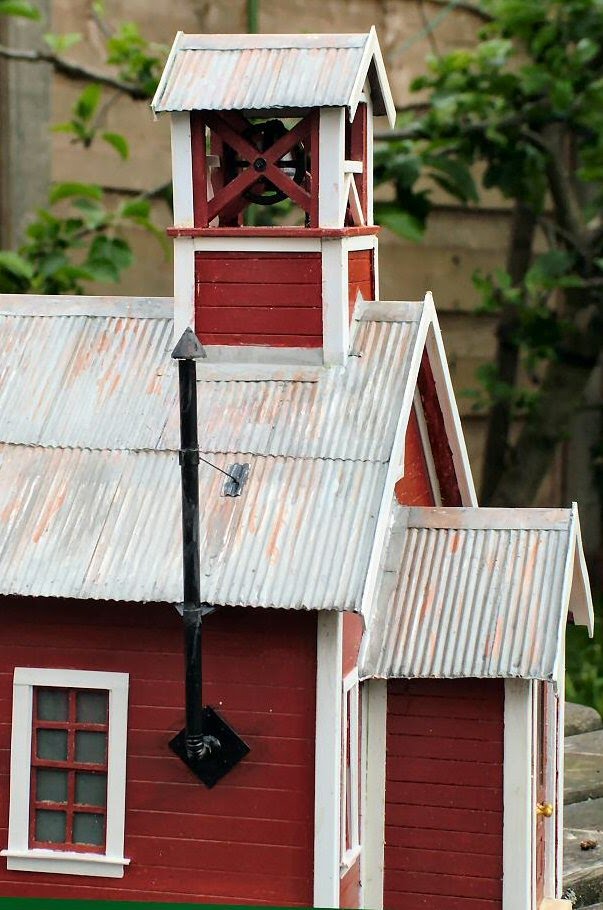
Finally, here are three photos of some of my corrugated iron rooves.
This is an unpainted roof which also shows how I finish off a stovepipe.
A closeup if the roof and belfry of a small rural schoolhouse, apinrted and slightly weathered.
Finally a building still under construction, being a Blacksmiths shop, the figure and wagon are from Schliech, and the doors are hinged and can be fixed can be fixed shut . This building has a weatherd (lightened brick red) roofTransfers are being made - the lettering shown is my 'try out' Another photo I have added of the rear of the Blacksmiths showing the freestone chimney, all the windows are made first from scratch - I cannot buy them so it is always the first thing to make, so they can be used to work out where and how to get them into my buildings. With my period they are invariably sash windows so each one is two parts, except for industrial 'cast iron' ones that is. Some of those will be needed soon for a machinists shop to go with my boiler shop - its in the queue 'to do' - trouble is there is one heck of a lot more as well! |
Workshop > Bricks & Corrugated Iron >


